


CyberLink PowerDirector 8.00.2013 + keygen+Serials
- Type:
- Applications > Windows
- Files:
- 1
- Size:
- 234.39 MiB (245778473 Bytes)
- Uploaded:
- 2009-09-12 20:28:47 GMT
- By:
- Murlok

- Seeders:
- 45
- Leechers:
- 3
- Comments
- 48
- Info Hash: A2C4B9D83F6624C7B73FBE6DDD12F7EB50A8D933

(Problems with magnets links are fixed by upgrading your torrent client!)
More powerful and even faster, CyberLink PowerDirector 8 offers more video enhancement and

editing tools, designer tools and more timeline tracks to let you create great videos. Spice

up your projects too by downloading any of the 13,000+ free effects and templates already

uploaded to DirectorZone by PowerDirector users.

Powerful Video Editing With Unlimited Possibilities

    * Create pro results with 16-tracks, particle effects designer, & more
    * 5X faster video rendering with support for CPU/GPU acceleration
    * Upscale SD video to HD-like quality. Fix video problems instantly
    * Learn editing tricks from other users on DirectorZone
    * Share videos onand Facebook, output to mobile devices, and burn to discs
A host of new tools and technologies are designed to save editing time and improve your

video quality. Leveraging PowerDVD's video enhancing TrueTheater technology, PowerDirector

delivers HD-like results from standard definition content by upscaling video resolution,

smoothing out playback in slow motion and enabling virtual surround sound.

With easy-to-use settings, PowerDirector's TrueTheater technologies fix common video

shooting errors such as extreme backlighting, poor white balance, and inadequate lighting.

Learn more about enhancing videos and photos
The first consumer video editing software to be optimized for Intel Core i7, NVIDIA CUDA,

and ATI Stream technology, PowerDirector delivers up to 5X faster performance for rendering

effects and transcoding videos, with vastly improved editing and previewing speeds.

:-:-:-:-:-:-:-:-:-:-:-:-:-:-:-:-:-:-:-:-:-:-:-:-:-:-:-:-:-:-:-:-::-:-::-:-::-:-::-:
:-:-:-:-:-:-:-:-:-:-:-:-:-:-:-:-:-:-:-:-:-:-:-:-:-:-:-:-:-::-:-:-:-:-::-:-::-:-::-:

                   Greetings fly to:

 RobbingHood, W13,Hoofa,Room101bellboy asterastripp,virusofsaten, ill88eagle,

Lama,Kentucky-Kid,Looksee,srijantje,Benny2guns,TauseeF.Toblakai,Ube1,Subtob, V-F,Reactor90

and konink The new @admin at Subrbay :)

 also to WCT-SWE even if we not agree always. To you who help me seeding my torrents and at

last to  my friends left the ship I do miss you and must login  some sites to meet you!!!!!

"The Scene give me Stuff to work with"

and to all I forgot!
 :-:-:-:-:-:-:-:-:-:-:-:-:-:-:-:-:-:-:-:-:-:-:-:-:-:-:-:-:-:-:-:-::-:-::-:-::-:-::-:
:-:-:-:-:-:-:-:-:-:-:-:-:-:-:-:-:-:-:-:-:-:-:-:-:-:-:-:-:-::-:-:-:-:-::-:-::-:-::-:


This one have serials and a keygen for keygen link is http://www.virustotal.com/sv/analisis/b44a4e4a31d77cba5626d658f714e2bcec6ee7802187545e80a127ccb3763732-1252708449 choice is yours  it also have one install on Russsia if needed!!!!
Enjoy
How to Revert Back to a Restore Point in Windows 7
The following steps are for in the event that you need to revert your Windows 7 computer back to the previous configuration state of saved restore point. To understand more about restore points and how to create them in the first place, see tutorial on creating restore points.
To revert Windows 7 back to a saved restore point…
1. Go to Control Panel …

2. Click on “System and Security” …

3. Click on “System” …

4. Click on “System protection” link

5. In the “System Properties” dialog, click the “System Restore” button …

6. A dialog will come up saying that the restore may have the possibility of uninstalling some software and drivers. But it will not affect your documents and personal files. In other words, deleted files will not get restored. Restore points are not for data backups. In the same token, newly created files will not disappear either after a restore. Restoring from a restore point should not alter any user data files or documents. Only system settings will revert back to the restore point state. Click “Next” to continue.

7. The next dialog will list your possible restore points with the time and date of each restore point. Checkmark “Show more restore points” in order to see more.

As you can see, some restore points were automatically created by Windows 7 upon major events such as system updates. Windows 7 will usually will create a restore point prior to installation of most software (but not all software installation will trigger a creation of a restore point). A restore point is also automatically created by Windows 7 prior to doing a restore. Hence it is possible to “undo” a restore. Except when you are doing a restore during “safe mode” or using the System Recovery Option — then there is no undo for the restore.
Note that when the System Restore disk space fills up, old restore points are deleted as new restore points are created.
8. To see what might be affected by the restore, you can click the “Scan for affected programs” button which will give you a dialog listing any programs and/or drivers that might be deleted or restored during the process.

9. Click the “Next” button to proceed with the restore.
10. Confirm your restore point by clicking “Finish” button …

Windows 7 will have to restart in order to complete the restore process. So save any files and close any programs before doing this.
11. Once the restore process starts, it can not be interrupted. So one final dialog, ask if you want to continue …

Click Yes.
12. After an automatic system restart, you should see a dialog confirming that the restore was successful

13. Since we had just done a restore, if you go back to the System Restore dialog, you will see an option to undo this restore.

This undo will not be possible if you had done the restore while in Safe Mode or under System Recovery options.
14. And if you go back to look at the list of restore points now after the restore, you will see an extra restore point that Window 7 created for you just prior to the restore. This restore point is used for the undo function.

This extra restore point will not be present if you had done the restore while in Safe Mode or under System Recovery options.
Windows 7 will often automatically create a restore point just prior to a software installation. But there might be a possibility that it might not do so for all software installations. Below, we see that it had automatically created an restore point prior to installation of Adobe Lightroom 3 Beta, Java, and OpenOffice.org

AYAM MASAK LEMAK CILI PADI
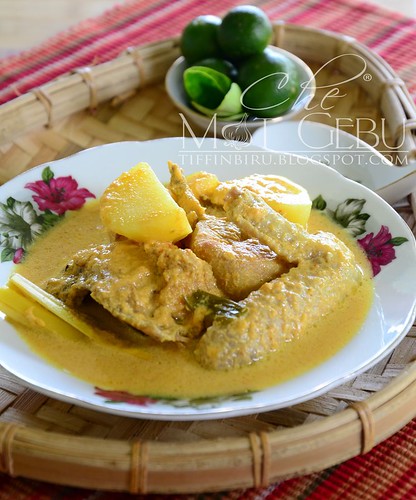
Assalammualaikum, salam Ahad. Masak apa hari ini?. Cm agak malas nak masak sejak2 ni, tapi masak juga yang senang2. Ayam masak lemak cili padi cm plan masak pagi tadi. Semalam ada sedara cm datang menziarah Bak, dan mereka bawakkan cili padi. Bukan rumah cm takde pokok cili padi, cuma bila cm nampak cili padi yang segar, yang merah, terus teringin nak masak ayam masak lemak cili padi. Mula2 plan nak campur belimbing buluh, tapi belimbing habis meluruh dari pokok. Maka cm letak kentang. Cm guna kurang lebih 1/2 ekor ayam. Kalau dapat ayam kampung lagi bess, yang cm guna ayam daging. Walaupun 1/2 ekor tapi bukan saiz ayam yang besar sangat. Ok resipi seperti berikut..Dan anda boleh masak awal untuk mendapat rasa yang lebih sedap....
BAHAN-BAHANNYA :-)
1/2 ekor ayam, potong ikut suka, cuci bersih dan toskan
3 - 4 biji kentang saiz sederhana, kupas, belah 4 setiap 1 dan rendam
3 batang serai, dititik
2 helai daun kunyit, disiat
800 ml santan cair
400 ml pati santan
1 kiub ayam (optional)
Air jika perlu
1 keping asam gelugor
Garam dan gula secukup rasa
BAHAN KISAR HALUS :-)
7 biji bawang merah
3 ulas bawang putih
1 inci halia
1 inci kunyit hidup
1 genggam cili padi merah kampung
CARA MEMBUATNYA :-)
- Satukan ayam, serai titik dan bahan kisar halus ke dalam periuk, gaul rata dan masak hingga ayan kecut. Tuang santan cair, kacau dan biar mendidih. Masukkan kentang dan masak dengan api sederhana hingga kentang 3/4 empuk.
- Tambah asam gelugor, kiub ayam (jika guna) dan air, jika perlu. Tuang santan pekat dan kacau rata. Biar mendidih perlahan. Masukkan daun kunyit, garam secukup rasa dan sedikit gula. Masak sekejap lagi, rasa dan jika ok boleh matika api. Hidangkan bersama nasi panas dan lauk2 lain.
10 Ways to Make Your Laptop Run Faster
There is nothing more frustrating than your computer locking up, freezing, or just being pokey, especially if the client is patiently waiting for the presentation or the paper is due. Laptops are extremely accessible to everyone, yet if only the knowledge to keep them optimized was that easy to come by.
These 10 tips are simple things you can do to make your laptop run faster.
- Start with a disk cleanup. There are several ways to access this, but one is to click on the Start Program>All Programs>Accessories>System Tools>Disk Cleanup. This will allow you to delete temporary Internet Files, Offline Files, the recycling bin, and other types of unnecessary files.
- Through the Control Panel, go to Internet Tools and delete cookies and history. This can take several minutes if it hasn’t been done in awhile.
- Disk Defragment. You can access this the same way as a disk cleanup, but select disk defragmenter instead. Many programs allow you to schedule a time to do this application, as it can take several minutes or several hours depending on how much work is to be done.
- Malware or Spyware are big offenders of slowing down laptops. Installing and running an anti-malware or anti-virus program and running it regularly will often times make a tremendous difference.
- Check your power management by accessing the Control Panel. Select power management and then Maximum or Best Performance. If you use your battery pack rather than being plugged in it will drain quickly, but will give you optimal speed.
- From the Control Panel, go to Add or Remove programs. Remove programs that you know you are not using. This can be a daunting task, since some programs affect others, and therefore you may want to know what’s important before you remove it.
- Check the memory usage of your computer. You may need to add more random access memory (RAM) to store memory, rather than using disk space that is slower in all cases.
- Consider using registry software cleaner or repair program. There are many good ones out there such as ccleaner.com or registryfix.com. These will identify and repair problems within the registry.
- New computers that use Windows Vista can be slowed down by excess animation. It is possible to turn it off by going to the Control Panel>System and Maintenance>Performance Information and Tools>Advanced Tools. Then select Adjust the Appearance and Performance of Windows. The Performance Options box will prompt, and if you select Custom, then uncheck Animate Windows when Maximazing and Minimizing. You can consider other options as well, but this definitely pep it up.
- Use an external hard drive to store all music, photos and games. It can be unplugged and used with multiple computers, and will save valuable space.
These ten tips are proven ways to get that computer moving and prevent untimely frustration. By utilizing some or all, you will be optimizing your system and working efficiently.
SEATTLE — The Perseid meteor shower is hitting its peak, and you can watch the action live
SEATTLE — The Perseid meteor shower is hitting its peak, and you can watch the action live, right here.
The live video feed, which you can see above, will be streamed from the website’s telescope in the Canary Islands. Monday is the peak of the shower, with as many as 100 meteors per hour predicted.
And if you can’t escape your home or cubicle on Monday night, you can keep watching the show through most of the evening.
 This year’s Perseid meteor shower should be especially dazzling, thanks in part to a minimum of light interference from a thin, waning moon. Sky watchers can expect to see as many as 100 meteors zip through the sky per hour, NASA officials said.
The Perseid meteor shower occurs each August as the Earth passes through the dust and debris left in the wake of the comet Swift-Tuttle. These stray bits of comet dust slam into our atmosphere at 132,000 mph, where they burn up and create light streaks across the sky.
NASA recently declared the Perseid shower to be the fireball champion of the annual meteor showers, because it has the highest concentration of especially bright meteors.
If you plan to watch from outside, try to get to the darkest area you can find. Bring a lounge chair and a blanket and make yourself comfortable.
Then relax and look toward the northeastern quadrant of the sky.
Happy viewing!
GetAmped2 Block and Counter Guide
GetAmped2 Block and Counter Guide by TPArtemis
First thing you need to know is that there are 2 types of blocking, Auto and Manual, I will explain these later. In GA2, many attacks are unblockable and it is advised to dodge instead of attempting to block, i.e. Woden Save’s last X held or Sealing Staff’s ZXC if ur hit in the center. Also, if you guard when u have almost no HP, you’ll still be alive.
1.Auto Guard
To block using Auto Guard, you have to hold X, XC, Spacebar or C depending on what type of attack the enemy is doing i.e. To block X attacks, hold X, to perfect guard with this, you have to press the key the same time as the opponent. I don’t use this myself since I have trouble using it, but it can be pretty annoying. Most people that use Auto will just spam X or C, but there are exceptions who actually try to guard i.e. MadnessR. Auto is definately the best for beginners but if ur still using Auto when u get to Star rank, and then suddenly change to Manual, ur gonna get habits from using Auto guard too much. That’s why it’s best to choose either Auto or Manual b4 u get to Star. Auto can actually be more useful against accs which have mid-combo holds i.e. Jack Mirage, Striker Ball, this is because people who put guarding before attacking i.e. Me, Mack, will try to guard the attack, but the attack might be unblockable but we dont know it. It can also be useful against TOI or Freezing Bracelts themselves, and other spammy accs, this is because the Auto Guard animation is faster than the Manual Guard animation. I find it harder to counter with Auto Guard because back in CB, when I used Auto, I never seemed to counter properly. Auto guarders are also more vulnerable to mix-ups i.e. CCCX because they woul;d have to do CX to block it, but they wouldn’t know if the opponent was going to use X or C at the end. As I said, I would reccomend Auto to beginners but I advice them changing to Manual when they’re ready.
2.Manual Guard
To block with Manual Guard, you simply have to press X and C at the same time, or use your hotkey for block, mine is B, to prefect guard, you simply have to press XC at the same time your enemy does his attack, MG seems to be able to Counter more and do Perfect Counters, but it can be hard to block mid way between Isa Neifheimer or Twin Blade’s C combos. Manual has a big advantage over Auto if fighting Black Blade, this is because the first 3 C’s are actually quite slow compared to some other accs, so if u counter the third C, then the forward movement you make when countering will let you dodge the Last X if it is held, but if it isn’t, then there’s 50-50 chance that you’ll counter or miss, another thing you can do is a turn-around counter, but I’ve only ever done this once in my life, and it wasn’t fighting BB, but it should hit the opponent if they hold the Last X. Manual seems to be more effective in 1v1 than a 8-man FFA, this is because in the FFA, your main goal is to edge or to deal damage and blocking doesnt really matter until it gets down to a 3-man FFA or a 1v1, but in 1v1′s, you just need to get the other persons HP down to 0 or have significantly more HP than the other person when the time is out.
3.Countering & Perfect Guard
Perfect Guards basically stun the opponent for a second, and you don’t lose HP if u PG. There are 2 types of counters, XC counters and X & C counters, XC counters are normally more damaging counters with cooler looking animations, and X & C counters are normally a single counter. Pursuit weapons can normally be used after a counter, but only quick ones like the Broadsword or Battleaxe. Some ZXCs i.e. Wrestler and Holds i.e. Justice Cape, are counters and normally you don’t lose HP if your hit by one. Some slow counters can be re-countered, but not unbloackle ones like Wrestler’s 2 Counters, ZXC Counters can also be re-countered if they’re crappy enough i.e. Tactical Gloves.
4.Useful Block & Counter Skills
Tanden Energy – You get some HP whenever you perfect guard
Erection – Not really a guard skill, but you can’t die until you’re knocked over
No Guard – Gives u 1 STR and 2 DEF, but you take more damage while blocking
Erection – Not really a guard skill, but you can’t die until you’re knocked over
No Guard – Gives u 1 STR and 2 DEF, but you take more damage while blocking
Resepi Kek Coklat Moist
Dah lama dah teringin nak makan chocolate moist cake ni. Nampak kat Petronas hari tu ada jual pastu terlupa beli lepas tu bila datang lagi sekali takde. So sedih pastu dah lah *baik buat sendiri. ekekke. Sebab buat sendiri boleh dapat banyak semua orang boleh makan sama-sama. *semangat kekeluargaan sangat. hihi. Nak buat pun senang je, sambil boleh menari-nari. ekekke. Berlagak kemain. Nah try lah buat. Serious sedap. T_T . Cubalah kome...
So mari hari ni belajar buat ....nak buat senang je. ...*saya jenis nak share recipe yang senang je. hihihi. Yang susah 100 tahun sekali baru share kat sini. ekekke
Mula-mula kita buat kek dia dulu, ni bahan-bahan untuk buat .Pergi kedai, sila beli 11 bahanni tau ! kena 11 bahan tau , kalau tak tak jadi. kihkih
1) tepung gandum
2) cawan gula perang
3) Serbuk koko (brand Van Hauton)
4) Susu pekat manis
5) Susu full cream (Dutch lady)
6) Soda bikarbonat
7) Baking powder
8) Minyak masak
9) Butter
10) 3 biji telur
11) Essence vanilla
Mula-mula buat cake dia dulu...Ok imagine macam buat eksperimen kimia dalam lab ok...mihmih.
Ini campuran X
.jpg)
1) 1 cawan gula perang
2) 1 cawan susu full cream
3) 1/2 cawan susu pekat manis
4) 1 cawan minyak masak
5) 1 cawan serbuk koko
Masukkan semua lima bahan tu dalam periuk tu , masak dalam api yang kecik and kacau sampai sebati ok.
Campuran Y
.jpg)
1) 1 1/4 cawan tepung
2) 1 TSP soda bikarbonat
3) 1 TSP serbuk penaik
Campur 3 bahan tu masuk dalam bekas macam tu and ayak kan untuk asingkan ketul2. Baru lah cake smooth je nanti. Kadang2 tepung macam ada ketul2 tu kan, so bila ayak jadi halus lah. mihmih. Mu pehe dop ni ?
Campuran Z
.jpg)
1) 3 biji telur
2) 1 TSP essence vanilla
PEcahkan 3 telur tu and kacau hingga sebati dengan 1 TSP esen vanilla tu.
Ok dah siap bahan eksperimen X, Y and Z tu, hasil macam bawah ni...
.jpg)
Ok pastu dah senang dah...
Z tu masukkan dalam X . Kacau sampai sebati sampai betul2 sebati.
Then Y tu masukkan dalam campuran X+Z tadi tu. Gaul sampai sebati. Make sure takde ketulan2 tepung. So bila dah siap sebati tu dah boleh kukus. Kukus dalam masa 1 jam 20 minit.
Pastu untuk buat dia punya topping tu untuk salut cake tadi tu guna 3 bahan ni..

1) 1 sudu butter
2) 1 cawan serbuk koko /satu bar chocolate tu. Saya pakai 1 bar chocolate sebab sebuk koko tadi tak cukup. kehkeh
3) 1/2 cawan susu pekat manis
masak semua bahan tu sampai sebati. Then salut atas kek yang dah siap tadi tu...macam gini....hiihihihihi
.jpg)
Taddaaaa ! Serious sedap. Ikut je resipi kek coklat moist ni pastu siap sedia untuk nomnomnomnom...hihi.
Pastu last sekali ratah balance chocolate....mihmih...makan dengan roti.
Selamat mencuba..! Toodless ! :D

Kreativitas yang dimaksudkan adalah sebuah tulisan, video atau gambar yang membuat orang tertarik untuk datang ke Fan Page anda, Cara agar mendapatkan uang adalah dengan cara :
penghasilan dari facebook
memanfaatkan facebook

Ikuti langkah langkah di bawah ini.
- Buat dulu akun Facebook anda disini, jika sudah punya login dulu.
- Buat Fan Page Facebook Klik disini.
- Buat akun adf.ly disini
- shrink setiap tulisan, video atau gambar anda ke adf.ly
- copy kode shrink anda dan bagikan di facebook, jangan lupa beri kata kata unik untuk menarik minat pembaca, setiap 10.000 orang yang melihat atau hanya membuka tulisan, video atau gambar yang anda masukkan, anda akan mendapatkan $5.00,-
- Perbanyak teman anda, dan minta dia mengikuti Fan Page anda.
- Bagikan juga cerita anda di twitter dan social media lainnya, semakin banyak akan semakin bagus.
- buatlah tulisan, video atau gambar yang berbobot, jangan menipu pembaca itu akan berakibat buruk kedepannya, pembaca tidak akan percaya.
- banyak banyak membagikan, biasanya setiap orang akan penasaran apalagi judul yang anda tuliskan unik dan menarik.
daftar adf.ly
(Update) Cute Blog Background & Cara Tukar Background Blog
Salam,


1. Buka Dashboard --> Design --> Template Designer --> Background

2. Korang click kotak yang bergambar tu, dan boleh la pilih background yang Blogger bagi. Kalau tak mahu, just tekan Upload Image dan Browse untuk pilih background yang korang mahu.


Pengguna Old Template
1. Pergi Dashboard --> Design --> Edit HTML
2. Tekan Ctrl+F untuk cari code di bawah. Selalunya code ni berada kat atas.
5. Preview. Kalau puas hati, tekan Save Template.
6. Cara nak upload gambar dalam Photobucket click SINI.
p/s ; So, hari2 aku nak tukar background belog!Yeah!
Hari ni nak introduce satu website yang bagus. Bagus ape?Hahah, bagus sebab provide layout blog yang cantik, cute, adorable dan macam-macam la.Kebelakangan ini, puas la saya mencari wallpaper/layout/graphic yang cantik, cun untuk blog.Tanya orang sana-sini, tapi tak dapat jawapan yang memuaskan. So, saya pon mencari la kat Google dengan keyword macam-macam. Akhirnya jumpa jugak. Persembahkan CherryBam Bam Bam Boom!  Okey, maybe ramai dah tau website ini, tapi takpe, mungkin ramai lagi yang tercari-cari tapi tak tau kat mana kan.
1.Korang hanya perlu pilih background di tab ALL MYSPACE LAYOUT & MORE.
2.Korang click je mana-mana gambar dan pilih.
3.Kalau nak save,click gambar dalam kotak2 tu-->right click kat gambar itu-->tekan View Background Image-->save as image.
4. Or, just amik je url gambar tu, upload dalam PhotoBucket .
Wah, macam la korang tak tau kan.Hihi. Dan kalau korang nak tahu macam mana nak masukkan background ke dalam blog, boleh scroll ke bawah lagi :)


Okey, maybe ramai dah tau website ini, tapi takpe, mungkin ramai lagi yang tercari-cari tapi tak tau kat mana kan.1.Korang hanya perlu pilih background di tab ALL MYSPACE LAYOUT & MORE.
2.Korang click je mana-mana gambar dan pilih.
3.Kalau nak save,click gambar dalam kotak2 tu-->right click kat gambar itu-->tekan View Background Image-->save as image.
4. Or, just amik je url gambar tu, upload dalam PhotoBucket .
Wah, macam la korang tak tau kan.Hihi. Dan kalau korang nak tahu macam mana nak masukkan background ke dalam blog, boleh scroll ke bawah lagi :)


Cara Nak Masukkan Background
Pengguna Template Designer1. Buka Dashboard --> Design --> Template Designer --> Background

2. Korang click kotak yang bergambar tu, dan boleh la pilih background yang Blogger bagi. Kalau tak mahu, just tekan Upload Image dan Browse untuk pilih background yang korang mahu.

3. Lepas dah selesai pilih dan browser pon dah loading image korang, tekan Done dan korang boleh pilih Alignment untuk tetapkan kedudukan background tu, Tile dan Scroll with Page. Bagi aku, baik korang jangan tick Scroll With Page, baru la nampak cantik dan kemas. Kemudian save bila dah puas hati.

Pengguna Old Template
1. Pergi Dashboard --> Design --> Edit HTML
2. Tekan Ctrl+F untuk cari code di bawah. Selalunya code ni berada kat atas.
body {3. Tukarkan code background: $background; dengan
background: $background;
background: url("http://i696.photobucket.com/albums/vv323/naz89_blog/30gif.png") repeat;4. Gantikan "http://i696.photobucket.com/albums/vv323/naz89_blog/30gif.png" dengan URL image yang korang nak. Kalau guna Photobucket, ambil Direct Link.
5. Preview. Kalau puas hati, tekan Save Template.
6. Cara nak upload gambar dalam Photobucket click SINI.
p/s ; So, hari2 aku nak tukar background belog!Yeah!


