Understanding encoding is all fine and good, but there are many gotchas involved in actually building a complex system consisting of many moving parts that uses anything but ASCII characters. This article shows how to get a PHP web application with a MySQL database set up to handle UTF-8 data front to back and explains common pitfalls.
Setup
We'll assume an application that needs to accept input of and output text containing any imaginable character currently supported by computers. For testing purposes, we'll use this block of text:
A good day, World!
Schönen Tag, Welt!
Une bonne journée, tout le monde!
يوم جيد، العالم
좋은 일, 세계!
Một ngày tốt lành, thế giới!
こんにちは、世界!
Please do not quote me on the accuracy of these Google translations, but it'll suffice for our testing purposes. If the text ever appears any different at any stage in your app, you have an encoding problem somewhere. Make sure you are actually testing your app with non-ASCII, non-Latin characters. Even a string containing "funny squiggles" found in European languages may not accurately show you whether you are correctly using Unicode; only text that contains characters from all over the Unicode table will.
The goal is to hardcode this text in an HTML/PHP file and have it display correctly in the browser. Further, we want to allow a user to input this text in a form, save it in a MySQL database, retrieve it again from the database and display it back on the page. The text should be stored correctly in the database, so when looking at the database content in a database admin utility or when searching for content, it will be displayed and found correctly.
Basic Concept
Handling encodings correctly within one system is not hard. Problems usually arise when exchanging data between two different systems. In our application, there will be two such interfaces between systems:
- PHP to browser/browser to PHP
- PHP to MySQL/MySQL to PHP
Text is exchanged as binary data behind the scenes. This series of bits and bytes may represent anything at all; what exactly it represents depends on the encoding it was created with and which it is interpreted with. Since the text itself does not specify what it was encoded with, this information needs to be transported as meta information between different systems.
Part 1: The Browser
To specify to the browser what kind of content you are giving it, there's the HTTP Content-Type header:
Content-Type: text/html; charset=utf-8
text/html is the standard MIME type for HTML pages, the additional charset= directive informs the browser which character encoding it should expect the document to be in. If this was set toapplication/xhtml+xml instead, the browser would fire up its strict XML parser and try to parse the page as X(HT)ML. If it was set to application/pdf, it would try to render the page as a PDF document and so on.
There are also the HTML meta tags
<meta http-equiv="Content-Type" content="text/html; charset=utf-8">
and its newer HTML5 version
<meta charset="utf-8" />
These tags are only fallbacks though which are only used when no HTTP Content-Type header was encountered (the wording "http-equiv" hints at this). It's also conceptually weird, since these tags are inside the document itself and the browser needs to read the document first in order to figure out what kind of document it's dealing with.
…confused pause…
So, the web server should always emit an HTTP header specifying the site's type and encoding. This can be configured in the web server itself, or it can be done using PHP by using
header somewhere at the start of the application, before any content has been output:
header('Content-Type: text/html; charset=utf-8');
Forms
So the browser knows how to interpret data that your web server sends to it. How should the web server know how to interpret data sent to it by the browser? The default behavior is that the browser will reply to the server in the same encoding that the server sent content to it. So by setting the above Content-Type header, you're pretty much already set to receive UTF-8 encoded data from the browser. To make this really explicit, you can set the accept-charset attribute on forms:
<form action="action.php" accept-charset="utf-8">
These two declaration together make it explicit to the browser in which encoding to communicate with the server. The client may also send an HTTP Content-Type header of its own, denoting the type of data and encoding that it sent to the server; this value can be found in the $_SERVER['CONTENT_TYPE'] variable. For form submissions this usually is application/x-www-form-urlencoded without charset attribute. This actually represents a problem, since the encoding to be used for application/x-www-form-urlencodeddata is practically undefined. Therefore, if a browser does not heed the accept-charset form attribute and sends data in some other encoding of its choosing without specifying the used encoding in the Content-Typeheader, all bets are off. The good news is that all browsers you will encounter in practice today are behaving properly in this respect.
Part 2: The Database
When connecting to the database, there's an implicit or explicit connection encoding. That means any textual data you send over this connection, the database will interpret in that encoding and any textual data you receive from the database will be encoded in that encoding. This is the main gotcha many people seem to miss when trying to store UTF-8 text in a database. But let's start from the beginning:
CREATE TABLE `texts` (
  `id` INT(11) unsigned NOT NULL AUTO_INCREMENT,
  `content` TEXT,
  PRIMARY KEY (`id`)
) ENGINE=MyISAM DEFAULT CHARSET=utf8;
This creates a table with a default character set of UTF-8. This does not actually mean anything yet, since the encoding is specific per text column. Any column that does not explicitly specify an encoding will be set to thisDEFAULT CHARSET. Consider this:
CREATE TABLE `texts` (
  `id` INT(11) unsigned NOT NULL AUTO_INCREMENT,
  `text` TEXT CHARACTER SET latin1,
  PRIMARY KEY (`id`)
) ENGINE=MyISAM DEFAULT CHARSET=utf8;
The actual column that stores the text is set to the latin1 character set. So any text that is stored in it will be stored in the latin1 encoding. This means this column can't store anything but the 256 characters defined in the latin1 encoding (a.k.a. ISO-8859-1 a.k.a. CP1252). The first thing then is to make sure that either all defaults are set to use utf8, or that at least the individual columns are set to it.
Note: The database server has a default character set, a database can have a default character set, a database tablecan have a default character set and finally the column has a character set setting. The rule is simple: if no explicit character set is specified for a column, the next higher default is used for it. The server, database and table defaults all have no influence whatsoever if the column has an explicit character set.
The next thing many people seem to be confused about is the collation setting. This simply refers to the rules governing character comparison. For example, it specifies how entries are sorted when ordering them alphabetically. It also specifies whether some characters should be regarded as identical when searching text, like whether a search for "matinee" should also match "matinée". Most collation settings also come in normal and _civariations, where _ci stands for case insensitive. Which collation to choose hence depends on what the column is supposed to be used for. For a column that stores user names, you probably want to be very strict and use thebinary (_bin) collation for your chosen character set, which only matches if two strings are identical. If you want to conduct freeform text searches on your database, you'll want to go with something more lenient to get more flexible search results.
So, the collation setting does not have anything to do with character or encoding support, it only relates to your ability to
search for data. This setting can also be overridden on a per-query basis, so it does not actually have any permanent effect on how the data is stored.
1
The Connection
Now here we are at the crux of the matter, something that seems to cause a lot of problem because it's a hardly visible setting: the connection encoding. Let's connect to the server:
$pdo = new PDO('mysql:dbname=encoding_test;host=localhost', 'user', 'pass');

// or maybe:

$con = mysql_connect('localhost', 'user', 'pass');
mysql_select_db('encoding_test', $con);
OK now, when querying data from the database, what encoding will it be returned in? When sending data to the database, what encoding
should it be in? The answer is: it depends. On the server and client settings, that is. You can read the in-depth explanation of what influences what in the
MySQL documentation. The upshot of it is that in practice it
often defaults to
latin1. So when sending data encoded in UTF-8 to a database expecting Latin-1 encoded data, the database will misinterpret the received data and convert it to something else. Even with the database, the table, the column and all collation defaults set to UTF-8, you still won't be able to properly store UTF-8 data in it, because the
connection defaults to
latin1.
The easiest and most reliable way to handle this is on the application level. How exactly depends on how exactly you connect to the database, but these are the most common ways:
$pdo = new PDO('mysql:host=localhost;dbname=encoding_test;charset=utf8', 'user', 'pass');

// or, before PHP 5.3.6:

$pdo = new PDO('mysql:host=localhost;dbname=encoding_test', 'user', 'pass',
                array(PDO::MYSQL_ATTR_INIT_COMMAND => 'SET NAMES utf8'));

// or:

$con = mysql_connect('localhost', 'user', 'pass');
mysql_select_db('encoding_test', $con);
mysql_set_charset('utf8', $con);
The first method specifies the charset to use in the connection string. Note that this only works
since PHP 5.3.6. The second method makes sure that the SQL query
SET NAMES utf8 is run after connecting to the database, which sets the necessary connection settings on the database server. The third method more or less does the same for the older
mysql client (which you shouldn't use anymore, really).
What Happens If You Don't SET NAMES Utf8
Here's the convoluted path your data will take if you leave the connection encoding set to latin1:
- say we have this byte sequence:
C3AB C3B1 63 C3B8 64 C3AE 6E 67
which represents the text "ëñcødîng" encoded in UTF-8 (multi-byte character bytes grouped for emphasis)
- we connect to the database, leaving the connection setting defaulting to
latin1
- we issue a query like
INSERT INTO table_name (column_name) VALUES ("ëñcødîng")
- the database expects Latin-1 encoded text and interprets the byte sequence for the word "ëñcødîng" in Latin-1, which turns out to represent these characters:
INSERT INTO table_name (column_name) VALUES ("«±c¸d®ng")
- the column encoding setting is set to
utf8, so the database converts the "Latin-1 encoded" data it received to UTF-8, storing the bytes
C382 C2AB C382 C2B1 63 C382 C2B8 64 C382 C2AE 6E 67
representing the text "«±c¸d®ng" in UTF-8
(MySQL's actual storage of UTF-8 may actually be more inefficient than that, but this will do for the sake of argument)
- we query the data again using
SELECT * FROM table_name
- the connection encoding is still set to
latin1, so the database will grab the UTF-8 encoded text and convert it to latin1 for us, returning the byte sequence
C3 AB C3 B1 63 C3 B8 64 C3 AE 6E 67
representing the text "«±c¸d®ng" encoded in Latin-1
- the client, oblivious to all of this, expects UTF-8 encoded data and interprets the bytes in UTF-8, which happens to evaluate to the text "ëñcødîng"
Therefore, you may have a transparent round-trip of UTF-8 data through the database, but the data is actually stored incorrectly in the database. This is important if the database is supposed to do anything with the text, like conduct searches on it, index it or even manipulate it. It also causes problems if you eventually do connect to the database using the correct encoding, since you'll then figure out that all your stored data is actually garbage. There should be no encoding conversion at any point along the chain browser → PHP → database → PHP → browser.
The Test
You can test if everything is working properly with this simple test application:
<?php

error_reporting(E_ALL);
ini_set('display_errors', true);

header('Content-Type: text/html; charset=utf-8');

$pdo = new PDO('mysql:dbname=encoding_test;host=localhost', 'user', 'pass',
               array(PDO::MYSQL_ATTR_INIT_COMMAND => 'SET NAMES utf8'));

if (!empty($_POST['text'])) {
    $stmt = $pdo->prepare('INSERT INTO `texts` (`text`) VALUES (:text)');
    $stmt->execute(array('text' => $_POST['text']));
}

$results = $pdo->query('SELECT * FROM `texts`')->fetchAll(PDO::FETCH_ASSOC);

?>
<!DOCTYPE html>

<html>
<head>
    <title>UTF-8 encoding test</title>
</head>
<body>

<h1>Display test</h1>

<p>
A good day, World!<br>
Schönen Tag, Welt!<br>
Une bonne journée, tout le monde!<br>
يوم جيد، العالم<br>
좋은 일, 세계!<br>
Một ngày tốt lành, thế giới!<br>
こんにちは、世界!<br>
</p>

<h1>Submission test</h1>

<form action="" method="post" accept-charset="utf-8">
    <textarea name="text"></textarea>
    <input type="submit" value="Submit">
</form>

<?php if (!empty($_POST['text'])) : ?>
    <h2>Last received data</h2>
    <pre><?php echo htmlspecialchars($_POST['text'], ENT_NOQUOTES, 'UTF-8'); ?></pre>
<?php endif; ?>

<h1>Output test</h1>

<ul>
    <?php foreach ($results as $result) : ?>
        <li>
            <pre><?php echo htmlspecialchars($result['text'], ENT_NOQUOTES, 'UTF-8'); ?></pre>
        </li>
    <?php endforeach; ?>
</ul>

</body>
</html>
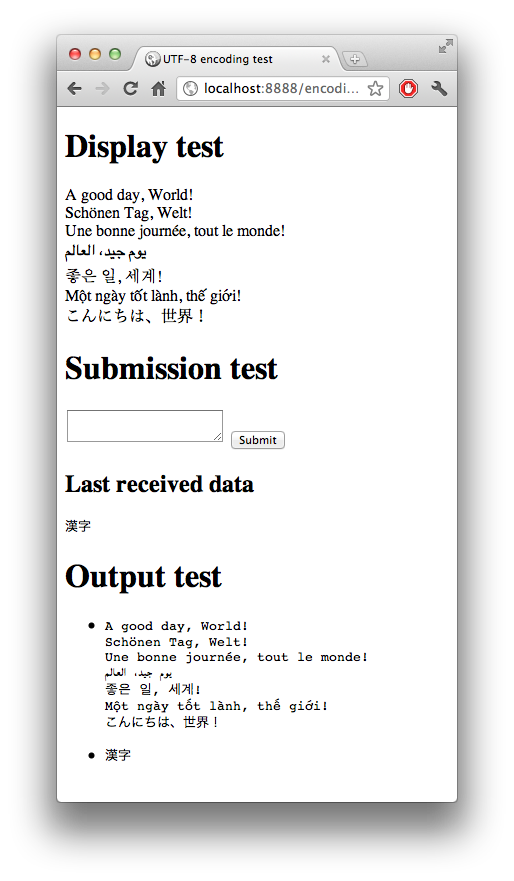
Copy and paste this into a .php file, edit the database connection settings as necessary, create the database as shown above, make sure to save the file as UTF-8 and open it in your browser. Feel free to input any data into the form or copy and paste the text from the display test for a good test sample.
The expected result should be something like this:
This tests the following often encountered problems:
- Is the text editor saving the source code as UTF-8? If not, the display test will screw up.
- Is the browser submitting data as UTF-8? If not, the "last received data" will screw up.
- Is the round-trip to the database working properly? If not, the output test will screw up.
You should additionally use your favorite database administration tool to look at the data as it's stored in the database.
 Last month, Mark showed us how to use Google Drive to host a continuously-updating archive of a Twitter account. Doing so means taking advantage of a new Google Drive feature, “site publishing.”